
This is an important post for us on TheYogipreneur as technique is the most important thing for our readers. Root chakra yoga poses bring attention to your feet, legs and contact with the floor. Mountain, Chair, Warrior II and supported variations of Tree are useful starting points. Add a comfortable squat and a few quieter floor poses, and you have a practice that explores steadiness without requiring advanced flexibility.
In chakra-based yoga, this work is associated with Muladhara, the root chakra. You can practice with that traditional symbolism in mind or simply use the sequence to notice your balance, breathing and physical support. The instructions below offer nine poses and a 15-minute plan, with options for different ranges of movement.
What root chakra yoga means
Muladhara is commonly translated as “root support.” In the familiar seven-chakra framework, it is associated with the base of the spine, the earth element and a sense of foundation. Yoga International explains these traditional associations as part of its introduction to the chakra system.
Chakras belong to a subtle-body framework rather than a map of medically established organs. A root chakra practice is therefore best understood as a theme for attention and movement. A pose cannot diagnose an energy blockage or guarantee relief from anxiety, digestive symptoms or pain.
For a fuller introduction to the symbolism, read our guide to root chakra meaning. This article focuses on putting the theme into practice through accessible movement.
How grounding yoga poses work in a practice
“Grounding” can be a concrete instruction. Notice which parts of you touch the floor. Observe whether your weight falls forward onto your toes or backward into your heels. Choose a stance in which you can breathe comfortably.
That gives Muladhara chakra yoga a practical focus. Standing poses ask you to organize your weight over your feet. Seated and reclining poses let you explore a broader area of support. Neither approach requires a particular emotional response.
If a teacher invites you to imagine roots growing into the earth, you can use the image when it helps. Paying attention to the actual sensation of your feet is equally valid.
Before you begin
Use a nonslip surface and have a sturdy chair or wall nearby. A folded blanket and one or two yoga blocks can make some positions more comfortable. Place a chair against a wall if you plan to hold it for balance.
If you are unfamiliar with the props, our guide to how to use yoga blocks explains stable placement and ways to choose an appropriate height.
Begin with a few easy movements, such as walking slowly in place, moving your ankles and opening and closing your hands. Keep your breathing natural; breath retention is unnecessary for this sequence.
Adjust or leave a pose if it causes sharp pain, numbness, tingling or dizziness. If you have an injury, are pregnant or need guidance about an existing condition, ask an appropriate clinician and qualified yoga instructor about suitable modifications. NCCIH’s guidance on yoga safety explains why instruction and individual adaptation matter.
Nine root chakra yoga poses to explore
The times below are suggestions for a short home practice. You can shorten a hold, pause between sides or repeat a familiar pose instead of trying a new one.
1 Mountain Pose
Mountain Pose, or Tadasana, gives you a simple way to explore standing balance.
Stand with your feet a comfortable distance apart, roughly under your hips.
Let your arms rest beside you and soften your knees.
Notice the pressure beneath your heels and the bases of your big and little toes.
Allow your spine to lengthen without pushing your ribs forward.
Take four to six easy breaths.
Try shifting your weight very slightly forward and backward, then settle near the middle. Keep the movement small enough that you remain comfortable.
For more support, stand near a wall or rest your hands on the back of a stable chair. The purpose is to notice your foundation, so there is no need to close your eyes or bring your feet tightly together.
2 Chair Pose
Chair Pose, or Utkatasana, adds a manageable amount of leg effort to the standing foundation.
Begin in Mountain with your feet comfortably apart.
Bend your knees slightly and move your hips backward, as though approaching a chair.
Keep your weight distributed across your feet.
Place your hands on your hips or reach your arms forward.
Hold for two or three breaths, then straighten your legs.
Repeat once or twice if the movement feels comfortable. A shallow bend is enough; the depth of the pose does not determine the quality of the practice.
You can also sit onto a sturdy chair and stand up again slowly. This variation provides a clear destination and may feel more approachable than holding a free-standing squat.
3 Warrior II
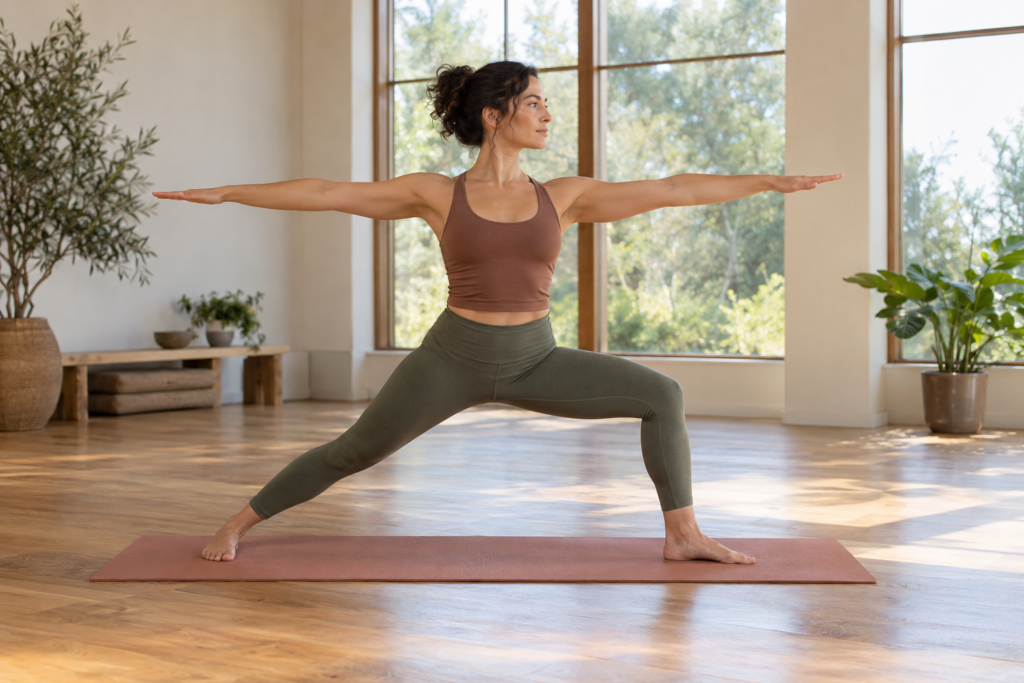
Warrior II, or Virabhadrasana II, uses a broad standing base and introduces a different distribution of weight.
Take a comfortable wide stance.
Turn one foot outward and angle the other slightly inward.
Bend the knee over the outward-facing foot in the same direction as its toes.
Keep the other leg comfortably extended and both feet connected to the floor.
Open your arms if comfortable, or keep your hands at your hips.
Take three to five breaths before changing sides. Make the stance shorter or the knee bend shallower when needed.
Rather than trying to keep both legs equally loaded, notice that they have different jobs. The bent leg accepts more of the forward movement while the back foot helps provide support. Keep enough ease to move out of the pose without rushing.
4 Tree Pose with support
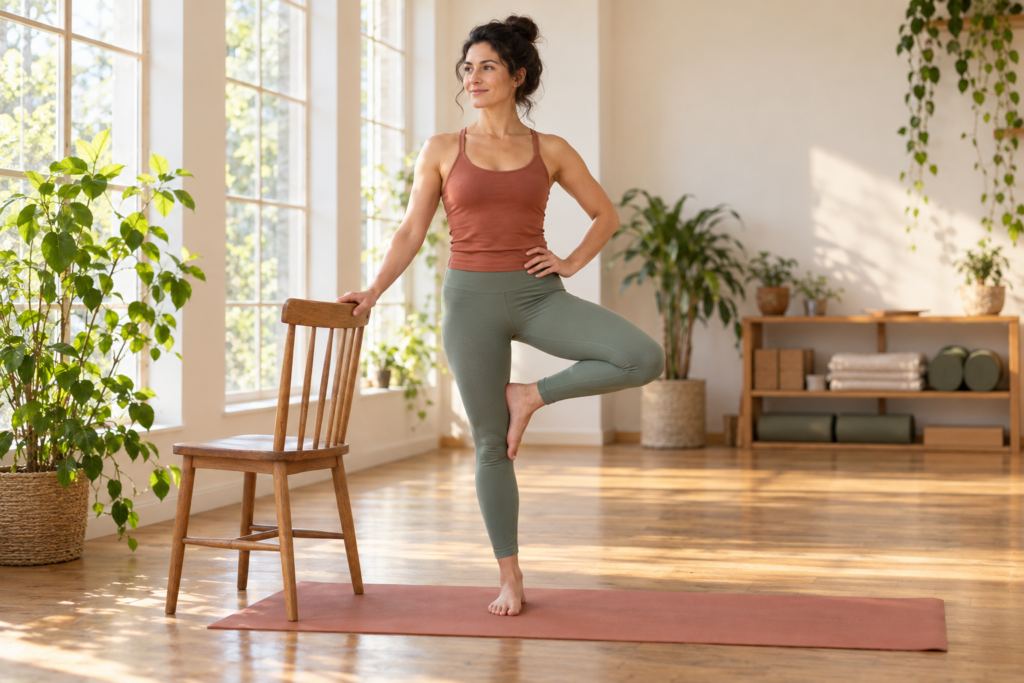
Tree Pose, or Vrksasana, explores stability on one leg. Use a wall or chair from the beginning if you want one.
Stand beside your support and shift your weight into the foot closest to it.
Turn the opposite knee outward by a comfortable amount.
Place that foot against the standing ankle, leaving its toes on the floor.
Keep your gaze on a stationary point.
Stay for a few easy breaths, then switch sides.
You can move the foot to the calf if that feels appropriate, while avoiding direct pressure against the knee joint. Keeping the toes down is a complete version of the pose.
Wobbling is useful information. Touch the floor, adjust your stance and continue. Forcing yourself to remain upright after losing balance adds little to a grounding practice.
5 Wide Legged Forward Fold with support
A supported version of Prasarita Padottanasana allows a broad stance without requiring your hands to reach the floor.
Stand with your feet comfortably wide and approximately parallel.
Rest your hands on your hips and soften your knees.
Hinge forward from your hips only as far as you can comfortably maintain.
Place your hands on a stable chair seat or suitable blocks.
Keep your neck in line with your spine and breathe normally.
A small forward angle is enough. You do not need to lower your head below your heart, straighten your knees fully or pull yourself deeper.
Return by bending your knees slightly, bringing your hands to your hips and lifting your torso with control. If forward folding makes you dizzy or is unsuitable for you, remain upright in a wide stance instead.
6 Supported Garland Pose
Garland Pose, or Malasana, brings you closer to the floor. An elevated seat can make the position easier to explore.
Stand with your feet a little wider than your hips and turn your toes out as comfortable.
Bend your knees in the direction of your toes.
Lower only to a depth you can control.
If using a block beneath your pelvis, choose a broad, stable setup.
Keep your hands on a chair or bring them together in front of your chest.
A folded blanket beneath the heels can provide support when they do not comfortably meet the floor. Avoid pressing your elbows into your knees to force a wider position.
A regular chair squat is a useful alternative if a deep squat does not suit your knees, ankles or hips. Our Yogi Squat guide explores the posture in more detail.
7 Supported Child Pose
Child Pose, or Balasana, changes the focus from standing effort to resting contact.
Come to kneeling if that is comfortable for you.
Separate your knees enough to make room for your torso.
Move your hips toward your heels without forcing them to touch.
Rest your torso over a bolster or firm folded blankets if helpful.
Support your forehead so your neck can rest easily.
Stay for several breaths, adjusting the support until breathing feels unrestricted. A folded blanket can cushion your knees.
If kneeling is uncomfortable, sit on a chair, place your forearms on your thighs and lean slightly forward. You can explore quiet contact with support without recreating the floor position.
8 Bridge Pose
Bridge Pose, or Setu Bandha Sarvangasana, offers a short period of leg effort while your shoulders and feet remain supported.
Lie on your back with your knees bent and your feet flat.
Place your feet roughly hip-width apart, at a distance that feels manageable.
Press through your feet and lift your pelvis a small amount.
Keep your neck comfortable and your gaze upward.
Lower slowly, then rest before repeating.
Lift only as high as you can without pinching your lower back or holding your breath. Two or three small lifts can be more useful than a prolonged hold.
For this sequence, an active, modest Bridge is sufficient. You do not need to add a block beneath your pelvis. The final resting pose provides a simpler way to settle afterward.
9 Constructive Rest
Finish with your knees bent and your feet resting on the mat.
Lie on your back and choose a comfortable distance between your feet.
Let your arms rest beside you or place your hands where they feel comfortable.
Notice the contact beneath your pelvis, upper back and feet.
Allow your breath to continue at its own pace.
Remain for one or two minutes, then roll to your side before sitting up.
If lying flat feels uncomfortable, rest on your side with a cushion between your knees or sit comfortably on a chair.
This is a chance to notice what is present. You do not need to feel unusually calm, imagine energy moving or interpret every sensation.
A 15 minute root chakra yoga sequence
Use this plan when you want a short practice without deciding what comes next. The times include changing positions and pausing between sides; they are not instructions to hold every pose continuously.
| Part of the practice | Time | Main focus |
| Easy warm up and settling | 2 minutes | Comfortable movement and ordinary breathing |
| Mountain Pose | 1 minute | Contact through both feet |
| Chair Pose with rests | 1 minute | A shallow knee bend and controlled return |
| Warrior II on both sides | 2 minutes | A broad standing base |
| Supported Tree on both sides | 2 minutes | Balance with a chair or wall |
| Supported wide legged fold | 1 minute | An easy hinge and stable hand support |
| Supported Garland or chair squat | 1 minute | A depth that suits your body |
| Supported Child Pose or seated rest | 2 minutes | Comfortable contact with support |
| Small Bridge lifts and rest | 1 minute | Controlled movement through the feet |
| Constructive Rest | 2 minutes | A quiet finish |
| Total | 15 minutes | Includes transitions |
Choose fewer poses if changing levels takes longer. For example, keep the standing section, skip the squat and move directly into your preferred resting position.
A root chakra yoga sequence can also be entirely seated. Begin with both feet on the floor, explore gentle heel and toe lifts, make small seated side bends and finish with quiet breathing. The theme comes from how you use your attention, rather than how close your shapes look to the floor-based versions.
Using breath and attention without forcing a result
A simple approach to yoga for root chakra awareness is to connect one clear sensation with each breath. In Mountain, notice the floor beneath your feet as you breathe in. As you breathe out, soften any effort you do not need in your jaw or hands.
Keep the breath comfortable. If counting becomes distracting, drop the count. A forced slow breath or a long hold is unnecessary.
You might choose a brief intention such as “I can take this one step at a time.” Use wording that feels believable to you. If an affirmation does not fit your circumstances, return to a neutral observation: “My feet are touching the floor.”
Teachers can use this same approach when developing yoga flow ideas. Give students a concrete point of attention and allow them to interpret the experience for themselves.
Questions about root chakra poses
Which root chakra yoga poses are best for beginners
Mountain, a shallow Chair and supported Tree offer accessible standing options. Chair-based variations and comfortable reclining rest are useful when moving to the floor is difficult. Begin with a few familiar shapes and use support before balance becomes challenging.
How often can you practice root chakra yoga
Choose a frequency that fits your comfort and recovery. You might start with two or three short sessions a week, or use a few minutes of familiar movements when you have time. Increase duration gradually if the practice feels comfortable, and adjust when you notice fatigue or soreness.
Do you need to believe in chakras to use the sequence
You can follow the movements as a grounding yoga practice while treating the chakra framework as cultural or philosophical context. Focus on balance, floor contact and comfortable breathing. No particular belief or emotional response is required.
Can yoga unblock the root chakra
“Unblocking” is language used within some chakra-based teachings. There is no clinical test showing that a particular pose has opened a chakra. You can explore the symbolism through practice without interpreting physical or emotional symptoms as proof of a blockage.
Can you combine root and heart chakra practices
You can build a class that moves from standing foundations into comfortable upper-body movement. Choose the sequence for the people practicing rather than trying to include every chakra. Our heart chakra yoga poses guide introduces another related theme.
For your next session, choose three familiar poses and one resting position. Notice whether a smaller range, a shorter hold or additional support lets you practice with more ease.