Crow pose yoga (Kakasana) might seem daunting to beginners. This powerful arm balance doesn’t need enormous strength to learn. The pose relies more on proper form and balance, making it available to many practitioners. Students between ages 4 and 74 have learned this pose successfully, showing how people of different fitness levels can practice it.
Yoga students usually learn Crow Pose as their first arm balance. The pose gives you a chance to build upper body strength and develop core stability. On top of that, it substantially improves focus and builds confidence when practitioners feel that magical moment of their feet lifting off the ground. The proper technique can turn this seemingly tough posture into something you can achieve. This piece will show you how to learn crow pose without worrying about falling on your face.
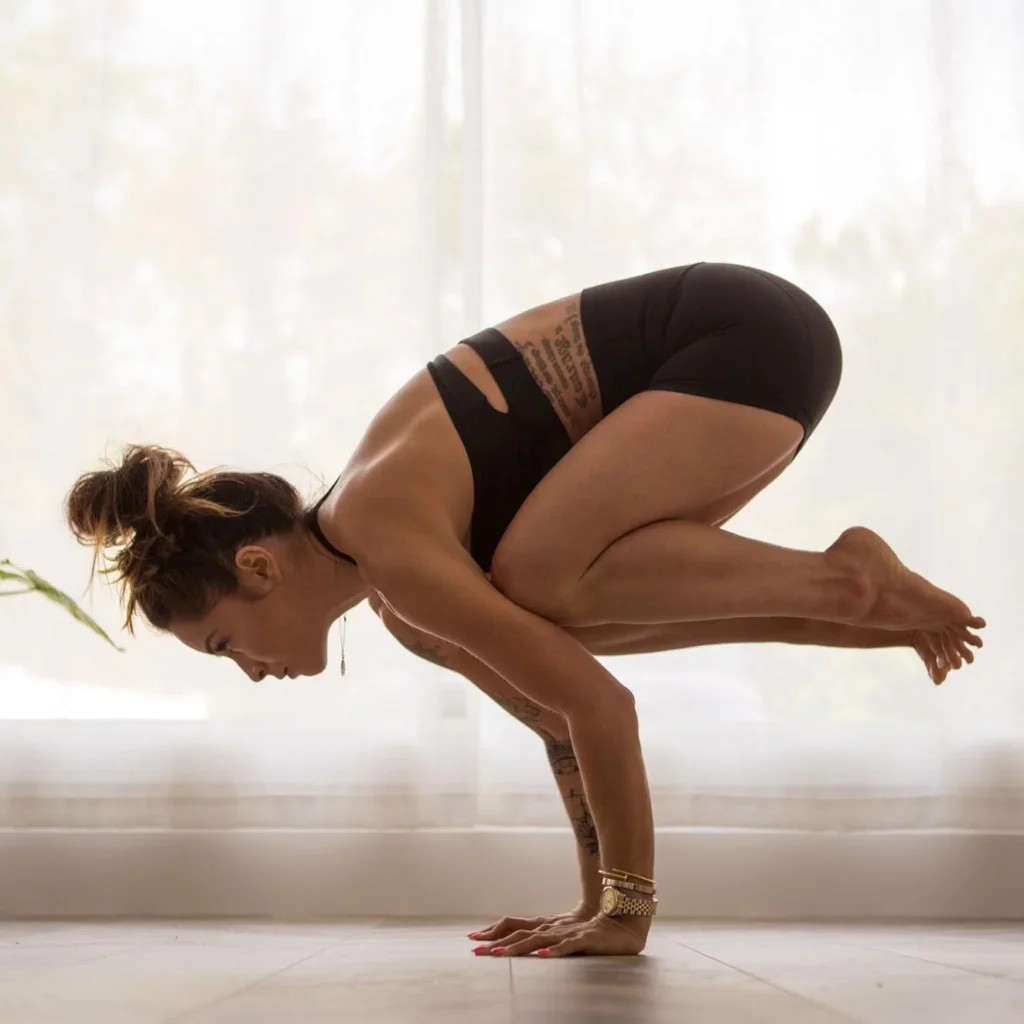
Table of Contents
- 1 Understanding Crow Pose and Its Variations
- 2 Preparing Your Body for Crow Pose
- 3 Step-by-Step Guide to Mastering Crow Pose
- 4 Using Props to Build Confidence
- 5 Common Mistakes and How to Avoid Them
- 6 Here are some FAQs about the crow pose yoga:
- 6.1 What is the crow pose good for?
- 6.2 What’s the hardest yoga pose?
- 6.3 How to crow pose beginner?
- 6.4 Why is the crow pose so difficult?
- 6.5 Which yoga pose has the most benefits?
- 6.6 What are common mistakes in crow pose?
- 6.7 Which pose is Queen of yoga?
- 6.8 Is the crow pose advanced?
- 6.9 What should you not do before yoga?
Understanding Crow Pose and Its Variations
Learning arm-balancing poses starts with mastering the basics and their variations. These challenging yet rewarding postures are the life-blood of advanced yoga practice.
What is Crow Pose (Kakasana)?
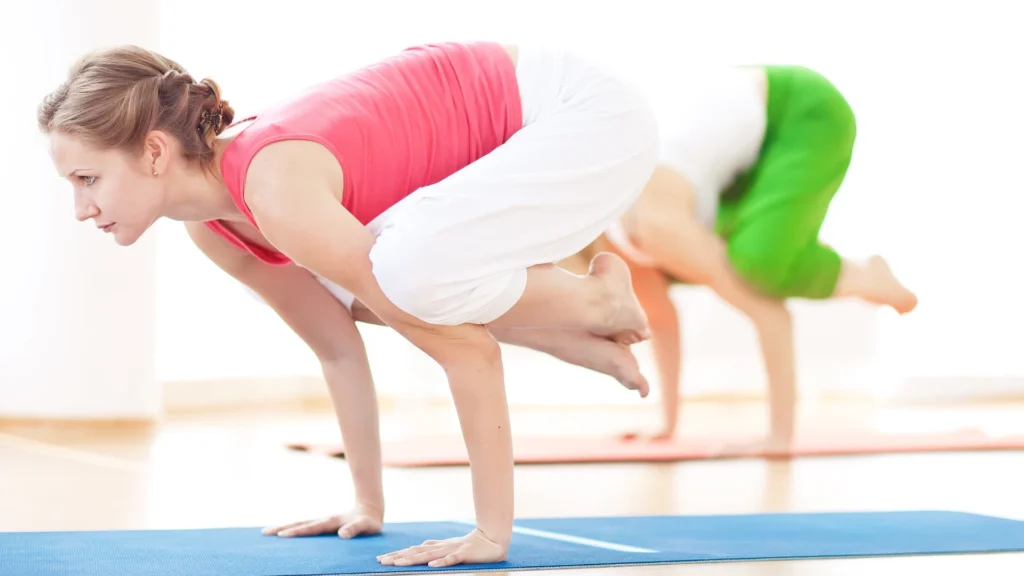
Crow pose yoga (Kakasana) opens the door to arm balances in yoga practice. This basic posture lets you balance your body weight on your arms as you lift your feet off the ground. The pose might look scary, but we learned that good technique matters more than strength.
Kakasana does more than just look cool. Your upper body gets stronger, your core becomes stable, and you develop better focus. You’ll find that mastering crow pose leads to more advanced arm balances and inversions, which helps yogis at every stage of their practice.
The right way to do crow pose keeps your arms bent at about 90 degrees (like chaturanga arms). This creates a “shelf” with your triceps where your shins can rest. Your weight spreads evenly between your arms and core, giving you a solid base to balance.
Crow vs Crane Pose: Key Differences
People often mix them up, but crow pose (Kakasana) and crane pose (Bakasana) are different postures with their own unique features:
| Feature | Crow Pose (Kakasana) | Crane Pose (Bakasana) |
|---|---|---|
| Arm Position | Bent at 90-degree angle | Straight or slightly bent |
| Knee Placement | Rests on triceps | Tucked closer to underarms |
| Difficulty Level | More available, beginner-friendly | More challenging, requires greater strength |
| Body Height | Lower to the ground | Higher off the ground |
The biggest difference shows up in arm positioning. Crow uses bent arms, making it easier for beginners to start. Crane pose needs straight arms, so you’ll need stronger upper body and shoulder muscles, plus serious ab strength.
These differences matter a lot to practice properly. Most yoga teachers suggest getting really good at crow pose before trying crane.
Is Side Crow Pose Yoga the Same?
Side Crow Pose (Parsva Kakasana) takes things up a notch by adding a twist to the arm balance. The regular crow pose puts each knee on one arm, but side crow needs both knees on one side, which makes balancing much trickier.
This mix of twisting and arm balancing creates a unique challenge. A fellow practitioner puts it well: “It has all the benefits and good vibes of an inversion with a detoxifying layer of compression on top!”. You should feel comfortable with regular crow pose before trying this variation.
Side crow works different muscles than regular crow. Your side abs, hip flexors, and outer glutes get a good workout. The pose builds upper body strength and adds twisting benefits that help your digestion and internal organs work better.
Names matter here too, just like with crow and crane. Parsva Bakasana means side crane pose (straight arms), while Parsva Kakasana means side crow (bent arms). Many yoga classes use these terms interchangeably though.
Preparing Your Body for Crow Pose
You need a step-by-step approach to master crow pose yoga. Most people struggle not because they lack strength but because their bodies aren’t ready for this unique arm balance. A well-laid-out preparation focusing on specific areas will help you take flight.
Warm-up Poses to Open Hips and Wrists
The secret to nailing crow pose lies in your hip flexibility. Your knees won’t sit properly against your upper arms without mobile hips, which makes balancing almost impossible. Your wrists will support most of your body weight, so they need special attention too.
These poses will help prepare your hips:
- Malasana (Deep Squat): This basic position matches the starting shape for crow pose and teaches you proper weight distribution.
- Half Happy Baby: This lets one leg naturally drop to the ground beside you, creating space in your hip joints.
- Child’s Pose: This does more than relax you – it gives you a supported version of the crow shape.
- Lizard Pose: This creates deep opening in your hips and inner thighs, which you need for proper knee placement in crow.
To prepare your wrists, try gentle stretches that increase flexibility. Start with your palms up and pull your fingers back gently. Next, flip your hands and press them against a wall with fingers pointing down. Hold each position for 30 seconds.
Breathing Techniques to Build Focus
Your breath is the life-blood of successful crow pose practice. Learning breath control will help your entire yoga practice and daily life.
Work on your ujjayi breath (victorious breath) before trying crow pose. Take full, deep breaths through your nose while slightly constricting your throat during exhales to create an audible sound. This style of breathing heats your body from within and reminds you to stay aware of your breath during challenging poses.
Here’s a simple trick – try smiling while you practice. You can’t hold your breath while smiling, which naturally keeps your breathing steady.
Strengthening Your Core and Arms
Crow pose needs several muscle groups working together, especially your core, shoulders, and arms. These strong areas create your foundation for balancing.
Core Strengthening: Your core powers crow pose by creating stability and preventing collapse. Try boat pose (Navasana) to target the exact ab muscles you’ll need. Crow crunches on your back with knees pressed into elbows work the same core muscles you’ll use in the pose.
Upper Body Preparation: Your shoulders, chest and arms must support your weight. These plank variations build the right muscles:
- Standard plank (30-60 seconds)
- High plank with shoulders pitched forward
- Chaturanga push-ups with elbows close to ribs
Note that crow pose does more than just look impressive – it builds strong wrists and shoulders, makes you more balanced, and gives you better body control. The preparation itself offers many benefits, making the learning experience just as valuable as the final pose.
Step-by-Step Guide to Mastering Crow Pose
Becoming skilled at crow pose yoga needs a systematic approach that breaks this complex balance into doable steps. You can achieve this impressive pose safely and confidently with the right technique and patience.
Step 1: Start in Garland Pose
Start by positioning yourself in Malasana (Garland Pose), a deep squat with feet about hip-width apart. You can bring your feet closer together with toes slightly turned out if it feels comfortable. Keep your spine tall while bringing your palms together at heart center and press your elbows against your knees’ inner sides. This position creates a base that leads to success in crow pose by properly arranging your hips and opening your joints.
Take a few deep breaths to center yourself. Your spine should stay upright without hunched shoulders. Don’t worry if your heels lift off the ground as you prepare to lean forward.
Step 2: Place Hands and Activate Core
Place your palms firmly on the floor about shoulder-width apart, roughly 6-8 inches in front of your feet. Spread your fingers wide like a starfish and press firmly through each finger’s knuckles, especially your index finger and thumb. This hand position creates a solid foundation for balance.
Bend your elbows slightly and point them straight back rather than outward. Your core should activate by drawing your lower ribs toward your hip bones. This core engagement creates stability for balance and prevents you from relying only on arm strength.
Step 3: Move Forward and Lift One Foot
With engaged hands and core, start to move your weight forward as you rise to your tiptoes. This forward movement is vital—crow pose needs your center of gravity to transfer over your hands.
Work your knees high up onto your arms’ backs as you lean forward, ideally near your armpits. Higher knee positions give you more stability. Look slightly forward instead of down at the floor. This gaze helps you balance and keeps your neck aligned properly.
While leaning forward, lift one foot off the ground. Hold here for a breath and focus on stability before the second foot leaves the ground.
Step 4: Balance with Both Feet Off the Ground
After finding stability with one foot up, lift your second foot off the ground slowly. Bring your heels toward your buttocks as both feet rise and try to connect your big toes. This compact position helps you stay stable.
You’ll maintain balance by keeping your core deeply engaged and hugging your knees tight against your upper arms. Keep looking slightly forward as your upper back rounds strongly. Press firmly through your hands like you’re pushing the floor away.
Stay in the pose for 3-5 breaths. If your balance feels shaky, use small weight shifts—press into your fingertips when tipping forward or into your hand heels when leaning back. To exit smoothly, move your weight backward until your feet touch the floor.
Using Props to Build Confidence
Beginners find props helpful when they try crow pose yoga for the first time. Even experienced yogis sometimes use supportive tools to perfect their technique. These changes help you build strength and spatial awareness before attempting the full pose.
Crow Pose with a Block Under Feet
Blocks under your feet give you an advantage when learning crow pose. This change “gives you a head start to feel your weight shift forward, which is necessary to take flight”. Students with tighter hips or larger bodies find it easier to get into position with blocks under their feet.
To practice this variation:
- Place one block horizontally under each foot
- Enter garland pose (malasana) on top of the blocks
- Put your hands on the floor as you would for standard crow
- Try lifting one foot, then maybe the second
- Play with the “edge of peering over the cliff of what’s familiar”
The extra height lets you position your knees higher on the triceps, which creates better balance.
Reclined Crow Pose for Core Awareness
Reclined crow pose helps you understand crow mechanics without worrying about falling. One instructor explains this variation “is a great way to ease the fear of falling that often accompanies the arm-balancing version of this pose”.
To practice:
- Lie on your back with knees toward chest
- Separate knees wide with feet together
- Position elbows against inner knees
- Turn palms toward ceiling
- Draw lower ribs toward hips to work your abs
This simple position gives you an intense core workout—sometimes tougher than the upright version. You’ll learn the exact body mechanics needed for crow pose without balance concerns.
Crow Pose with Forehead on a Block
This change helps students who can briefly hold crow pose but can’t maintain it. Put a block at its highest setting in front of you, with the narrow face horizontal. After moving into the starting position and placing your knees onto your triceps, lean forward until your forehead touches the block.
The block “will make easier your balance and stability as you lift one or maybe both of your feet away from the ground”. Many yogis can balance longer with this head support, and they build strength and confidence with each practice.
Practicing on a Blanket for Safety
A folded blanket in front of your practice space can change how you approach crow pose. Having a soft landing spot removes mental barriers that stop progress. One instructor shares, “I first explored kakasana on my lawn—I knew that if I fell, it would be on soft grass, and therefore less scary than crashing onto a hard floor”.
This method brings a “childlike whimsy” to learning—note that falls are just part of the process. The safety this simple prop provides often makes the difference between holding back and exploring freely.
Common Mistakes and How to Avoid Them
Even seasoned yogis make common mistakes when practicing crow pose yoga. Finding and fixing these errors can help you move from constant falls to mastering this iconic arm balance.
Not Using the Core Enough
The core’s role stands as the most crucial yet overlooked part of crow pose yoga. Students who don’t activate their core muscles end up using just arm strength and collapse. The key is to “suction cup your belly button up and in toward your spine”. Your transverse abdominals need active flexing as you lean forward. This strong core connection creates the lightness you need to float, making the pose feel natural instead of forced.
Elbows Splaying Outward
The elbows often drift outward instead of pointing straight back. This wrong position puts too much stress on the outer edges of your wrists. You can fix this by keeping your elbows right above your wrists and close to your body. Note that “the further out they splay, the infinitely more difficult the hold becomes”. A stable foundation emerges from this alignment, which prevents wrist strain and keeps you balanced.
Looking Too Far Down or Up
Your gaze direction can make or break your balance in crow pose. Many students look at their hands or the floor, which throws them off balance quickly. Experts point out that “your gaze should be at least a foot forward past your fingertips”. Looking up too high strains your neck and tips you backward. A gentle forward gaze helps to “keep the chest lifted” and distribute your weight properly.
Fear of Falling Forward
The mind creates the biggest barrier to mastering crow pose. Many people don’t lean far enough because they’re afraid of falling forward. Yet “the dominant action that takes you into an arm balance is not up—it’s almost always forward”. You can curb this fear by placing a pillow or folded blanket in front of you. Your fingers act as brakes – “if you feel like you’re leaning too far forward, pressing them into the mat will shift your weight back”.
Learning the crow pose in yoga is challenging, but you can do it with the right approach. This basic arm balance opens doors to advanced poses and helps build strength, stability, and mental focus. Many new students feel nervous at first, but good technique matters more than pure strength. This understanding will reshape your learning experience.
Your success depends on proper preparation. You need to open your hips, build wrist strength, and develop core awareness to create a solid base before taking flight. Your breathing techniques will help you stay focused when your balance feels shaky.
Props are great tools to help you learn. You can put blocks under your feet, try reclined crow to understand the mechanics, or place a blanket for safety. These tools help overcome both physical and mental barriers.
Knowing common mistakes will prevent frustration as you learn crow pose. Your core muscles create stability. The right elbow position protects your wrists, and where you look affects your balance. Students often hold back from leaning forward because they’re scared. The funny thing is, once you accept you might fall, you’ll make faster progress.
Crow pose works for bodies of all types and fitness levels. This pose gives everyone – from age 4 to 74 – a chance to feel that magic when both feet leave the ground. It’s more than just a cool-looking pose. Crow pose builds amazing body awareness and gives you confidence that stays with you off the mat. Take small steps, celebrate tiny wins, and soon you’ll be floating with ease.
Here are some FAQs about the crow pose yoga:
What is the crow pose good for?
Crow pose is excellent for building upper body and core strength, particularly in the arms, wrists, and abdominal muscles. It also helps improve balance, focus, and body awareness while teaching weight distribution and proper alignment for more advanced arm balances.
What’s the hardest yoga pose?
The handstand scorpion pose is often considered one of the hardest yoga poses due to its extreme demands on balance, flexibility, and strength. Other notoriously challenging poses include the eight-angle pose and one-handed peacock pose, which require significant physical mastery and control.
How to crow pose beginner?
For crow pose beginners, start in a squat with knees wide, place hands shoulder-width apart, and lift hips while bending elbows. Practice shifting weight forward onto your hands, resting knees on the back of your upper arms, and lifting one foot at a time to build confidence in the balance.
Why is the crow pose so difficult?
Crow pose is difficult because it requires overcoming the natural fear of falling forward while developing sufficient wrist, arm and core strength. The pose challenges both physical strength and mental focus, as you must learn to trust your arms to support your body weight while maintaining balance.
Which yoga pose has the most benefits?
While many poses offer significant benefits, headstand is often called the “king of asanas” for its comprehensive benefits including improved circulation, core strength, and mental focus. However, different poses benefit various body systems, making a well-rounded practice most beneficial overall.
What are common mistakes in crow pose?
Common mistakes in crow pose include placing knees too low on the arms, not rounding the upper back enough, and failing to engage the core properly. Many beginners also keep their elbows splayed wide instead of hugging them toward the midline, which provides better support.
Which pose is Queen of yoga?
Shoulderstand is often called the “queen of asanas” for its numerous therapeutic benefits on the thyroid, circulatory, and nervous systems. This pose complements headstand (the king of asanas) in a well-balanced yoga practice.
Is the crow pose advanced?
Crow pose is typically considered an intermediate arm balance rather than an advanced pose, though it can be challenging for beginners. It’s often one of the first arm balances students learn before progressing to more difficult variations like side crow or flying crow.
What should you not do before yoga?
You should avoid eating a heavy meal within 2-3 hours before yoga practice as digestion can interfere with your practice. It’s also best to avoid consuming alcohol or caffeine immediately before class, as these can affect your hydration, balance, and focus during practice.