The Dancer pose yoga (Natarajasana) blends graceful movement with powerful benefits that go way beyond the reach and influence of the yoga mat. This striking posture makes practitioners more focused and calm while promoting better balance in their lives. Many beginners feel intimidated by the king dancer pose yoga, especially those just starting their practice.
The natarajasana pose packs remarkable physical benefits despite its challenges. It stretches multiple areas – the chest, shoulders, hamstrings, quads, spine, and hips – while building strength in the ankles, shoulders, core, and larger leg muscles. The dancer pose also enhances balance, stability, concentration, and postural awareness. This complete guide breaks down everything about the dancers pose yoga – from basic concepts and preparatory sequences to step-by-step instructions and variations that work for all experience levels.
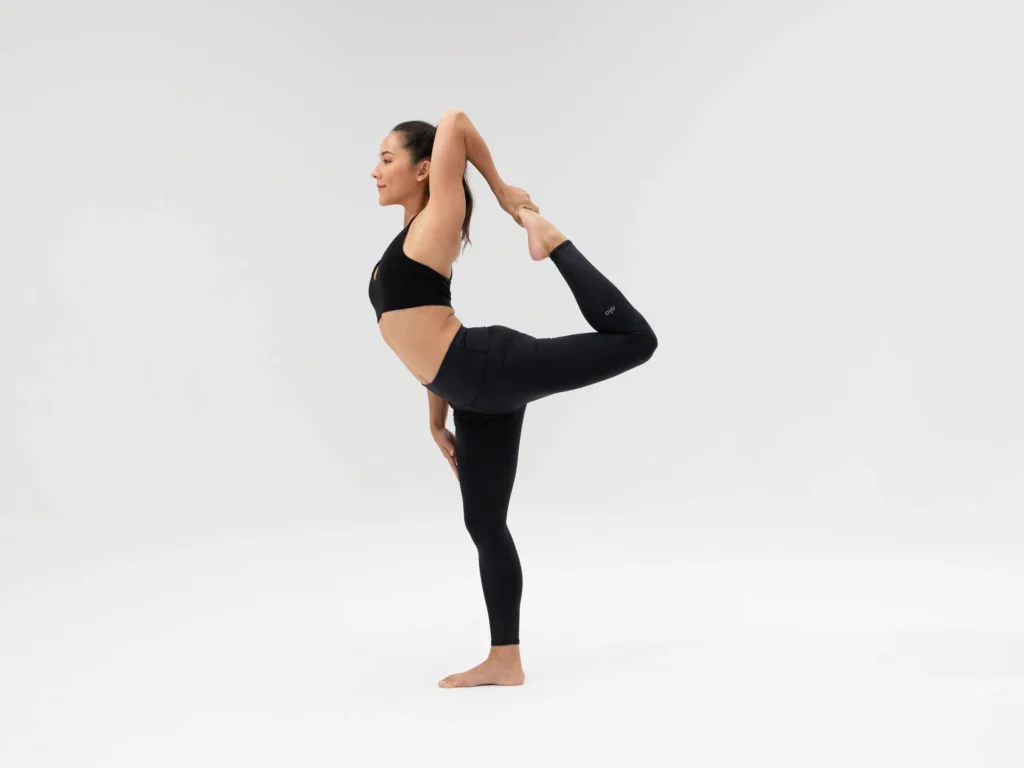
Table of Contents
- 1 Understanding the Basics of Dancer Pose
- 2 Essential Warm-Up Poses Before You Begin
- 3 Step-by-Step Guide to Entering Dancer Pose
- 4 Tips to Improve Balance and Alignment
- 5 Progressions and Variations for All Levels
- 6 Here are some FAQs about the dancer pose yoga tutorial:
- 6.1 How to cue a Dancer Pose in yoga?
- 6.2 How to do natarajasana step by step?
- 6.3 How to do yoga poses step by step?
- 6.4 What is the hardest yoga pose ever?
- 6.5 How to prep for a Dancer Pose?
- 6.6 What are the 4 main yogas?
- 6.7 Can I lose 10 kg in a month with yoga?
- 6.8 Is 20 minutes of yoga everyday enough?
Understanding the Basics of Dancer Pose
Natarajasana stands out as one of yoga’s most beautiful poses. This standing, balancing, back-bending asana blends strength, flexibility, and focus into a powerful position that tests practitioners of all levels.
What is Natarajasana pose?
Natarajasana is a dynamic standing balance pose. Practitioners stand on one leg while holding the other foot behind them to create a graceful arc with their body. The Sanskrit name has three parts: “Nata” (dancer), “Raja” (king), and “Asana” (posture or seat). Your body creates a beautiful expression of controlled movement and stability as you balance on one leg and extend the other behind.
The influential teacher Krishnamacharya brought this challenging pose into modern yoga during the early 20th century. His student B.K.S. Iyengar adopted it and made it his signature pose. You’ll find it on some editions of his groundbreaking book “Light on Yoga”. Iyengar described Natarajasana as a “vigorous and beautiful pose” that shows both strength and grace.
Why it’s called King Dancer Pose in yoga
The name honors Lord Shiva as Nataraja, the cosmic dancer who moves to the rhythm of universal creation and destruction. Hindu mythology portrays Nataraja as “the Dancing King” whose “ecstatic dance of destruction are the foundations for the creation and sustenance of the universe”.
Traditional Nataraja images show Shiva with four arms, standing victoriously over Avidya, ignorance’s demon. He holds a drum that marks time’s passage and a flame representing knowledge. These symbols connect to the pose’s core meaning – finding balance amid constant change.
The pose also links to Bharatnatyam, a classical Indian dance form. You can see it in temple statues at the Nataraja Temple in Chidambaram. The pose captures Lord Shiva’s dancing qualities: strength, intensity, balance, and graceful expression.
Key physical and mental benefits
Dancer pose builds strength in many muscle groups. The standing leg gets stronger, which helps your ankles, knees, thighs, and core. The backbend opens your chest, shoulders, and hip flexors while stretching your quadriceps and hamstrings.
Your balance and proprioception – your body’s sense of position – improve substantially through this pose. Better posture and coordination in daily life come from this heightened awareness.
The mental aspects are just as valuable. The pose demands focus and mind-body coordination. Regular practice makes you more focused and mentally sharp. Your chest and heart center open up, which brings confidence, joy, and emotional wellness.
Actor Mariel Hemingway puts it well: Natarajasana is “a beautiful pose with tremendous power,” like an archery bow’s balance and tension. With practice, dancer pose becomes more than a physical position – it turns into a moving meditation that unites strength, flexibility, and mental focus.
Essential Warm-Up Poses Before You Begin
A successful dancer pose practice starts with proper preparation. You should warm up with specific sequences that open your hips, chest, and shoulders while building heat in your body. These poses help you get ready for the balance and backbend challenges of king dancer pose.
Low lunge (Anjaneyasana)
Low lunge makes a great starting point. It gently stretches your hip flexors and introduces a mild backbend that gets your body ready for dancer pose. Here’s the quickest way to do it:
- Step one foot forward into a lunge position
- Back out of the lunge slightly before pushing your pelvis forward
- Activate between your two frontal hip bones like you’re cinching a drawstring
- This activation helps your deep abdominals work so your psoas can relax and “ungrip”
- Your low belly should lift to avoid collapsing onto the front thigh
- Sink deeper gradually and create an even stretch in all directions—through your legs and spine
- You can also lift your chest into a gentle backbend
This foundational pose shows up in Sun Salutation C, so it fits naturally into your flow. It helps your hip flexors prepare for the extension they’ll experience in natarajasana pose.
Wide fingertip cobra
This cobra variation opens your chest more than the traditional version—exactly what dancer pose requires. Here’s how to do it right:
- Walk your fingertips wide enough to extend beyond your mat edges while lying on your belly
- Place your hands in line with your heart (move forward if your shoulders feel too intense)
- Bow your head forward slightly before you start
- Lead with your chest as you inhale and rise while broadening through it
- Let your head follow your chest’s movement and keep length in your neck’s back
- Hold for several breaths or move through multiple repetitions
The chest opening matches what you’ll do in king dancer pose, making this a great way to get ready.
Humble warrior and cow face arms
These variations add shoulder and chest stretches to standing poses:
For humble warrior:
- Start in warrior II with your front knee tracking toward your pinky toe
- Interlace your hands behind your back with slightly bent elbows and straight wrists
- Broaden your collarbones, lift your sternum, and reach hands away from your pelvis
- Bow forward as you exhale and keep tracking your front knee outward
- Explore chest expansion in the forward-bending position
For cow face arms:
- Begin in warrior II with relaxed arms
- Reach one arm up by your ear, bend the elbow, and rest that hand on your upper back
- Rotate your opposite arm internally and reach back to clasp hands (or use a strap)
- Keep your spine long and breathe into your back ribs
- Create length through the bottom-arm side of your torso
These poses build the shoulder mobility you’ll just need to grab your foot in dancer pose while staying aligned.
Sun Salutations for flow and heat
Building internal heat is vital before trying challenging poses that require balance and flexibility. Sun Salutations work perfectly for this:
- Do several rounds of Sun Salutations A and C to warm your whole body
- Link one breath to one movement at a quicker pace
- Pay attention to low lunges in the sequence
- Keep your low belly engaged throughout
- Create even stretches in all directions—through your legs and spine
Newer students might want to move slower and focus on connecting with their breath rather than perfect form. Sun Salutations build physical heat and mental focus—both are the foundations of holding natarajasana pose successfully.
These preparatory poses create the best foundation for dancer pose. Each element—hip opening, chest expansion, shoulder mobility, and core engagement—directly helps you achieve the full expression of king dancer pose.
Step-by-Step Guide to Entering Dancer Pose
Becoming skilled at natarajasana needs proper technique and careful attention to how you arrange your body. A systematic approach helps you safely experience this powerful posture’s benefits while avoiding common mistakes that lead to instability or strain.
Start in Mountain Pose (Tadasana)
Your original foundation starts with standing tall at your mat’s top in Mountain Pose. Keep your feet together or hip-width apart. Plant firmly through all four corners of your standing foot and lift through your head’s crown to create length in your spine. Take a few deep breaths here to expand your chest and diaphragm. This centered awareness builds the stability you need for the balance ahead.
Change weight and grab the foot correctly
Plant yourself firmly, then move your weight to one leg—let’s say the right foot. Bend your left knee and draw the heel toward your buttocks. Once stable, reach back with your left hand to hold your foot.
You have two main grip options:
- Inside grip (big-toe side): This creates external rotation in your upper arm and prevents shoulder rollover
- Outside grip: Places your hand on the foot’s outer edge
The inside grip helps beginners achieve better shoulder arrangement and stability. As you hold your foot, create resistance by pressing your hand and foot against each other. Keep both knees close at first to find your balance before moving on.
Strengthen core and lift the chest
Keep your core strong by pulling the back-leg side of your belly toward the front-leg side. This vital action stops your hips from rolling open too much. Then broaden your collarbones while lifting your sternum to create space for the upper backbend.
Your free arm can take several positions:
- Extended forward at shoulder height
- Raised next to your ear with palm facing inward
- Placed at heart center to help your chest expand
Whatever arm position you choose, focus on creating the backbend in your thoracic spine instead of compressing your lower back. Kick your raised foot against your hand and try to lift the foot faster than your body leans forward.
Use a strap if needed for support
A strap helps most people when they start learning dancer pose yoga. Make a loop big enough to fit around your foot. Place the strap over your foot while in Mountain Pose, then bring it over your shoulder.
Start the pose by sliding the strap off your shoulder and holding it with the same-side hand. Pull it tight while pressing your foot into it to create proper resistance and arrangement. Move your hands down the strap as your flexibility improves until your hands and foot meet.
Practice dancer pose yoga regularly and focus on the process rather than trying to perfect it right away.
Tips to Improve Balance and Alignment
The dancer pose requires precise body alignment and focused attention to details that many practitioners miss. Small but significant adjustments can turn a shaky attempt into a powerful expression of natarajasana. This transformation builds strength and grace at the same time.
Square your hips and shoulders
Many practitioners rotate toward their lifted leg side during dancer pose. This habit compromises stability and might strain the lower back. You should square your hips toward the front edge of your mat. The back-leg side of your belly should move toward the front-leg side to prevent too much hip rotation. Your stability will improve when you involve the area between your frontal hip bones. Think of cinching a drawstring between them. This action activates deep abdominals and lets your psoas relax. A symmetrical foundation for your backbend emerges while reducing pressure in the hamstrings and standing hip.
Distribute weight evenly on standing foot
Your standing foot’s weight distribution forms the foundation of dancer pose. Press firmly through all four corners and ground through your big toe’s ball while keeping contact with your outer heel. A slight bend in the standing knee helps establish balance, especially if you tend to hyperextend. This tiny bend protects the joint and involves the quad muscles. You can gradually straighten the leg as your stability improves while keeping the muscles active.
Focus on upper backbend, not lower back
Create a gentle “U” shape with your spine instead of a sharp “V” shape that squeezes vertebrae. The backbend should come from the thoracic (upper) spine. Broaden through the chest and pull shoulders down away from your ears. This approach prevents lower back compression that often causes discomfort. Your chest should lead the movement rather than your chin while lifting. This creates space throughout your back body and maintains proper cervical spine alignment.
Keep your gaze steady for balance
Pick a fixed focal point slightly ahead at eye level instead of looking down. This drishti (focused gaze) activates your vestibular system and helps your balance significantly. You can try bringing your gaze upward as your confidence grows, but keep breathing steady. Note that balance in natarajasana comes from opposing forces. Lifting through the chest while pressing the foot into your hand creates these countering actions. These movements build stability even as you move deeper into the pose.
Progressions and Variations for All Levels
Practitioners can experience dancer pose yoga’s benefits whatever their flexibility or balance capabilities. Different skill level adaptations build confidence and ensure proper form throughout the practice.
Beginner-friendly dancer pose with chair
A chair variation offers stability without compromising form to newcomers learning balance postures. Students should position a folding chair in front and rest their hands on its back. The body’s weight moves to one leg while the opposite knee bends and lifts the foot behind. Another option places the chair behind with the raised foot resting on the seat. This approach builds the standing leg’s strength and develops proper hip alignment. Beginners and those recovering from injuries will find this modification particularly helpful.
King dancer pose yoga with strap
Intermediate practitioners benefit from using a strap to make the pose more accessible. The yoga strap loops around the raised foot’s top, with both ends pulled over the shoulder. Hands hold the strap at a comfortable length initially. Students can walk their hands closer to the foot as flexibility improves. This technique helps maintain square hips toward the mat’s front instead of splaying open—a common form error in dancer pose yoga.
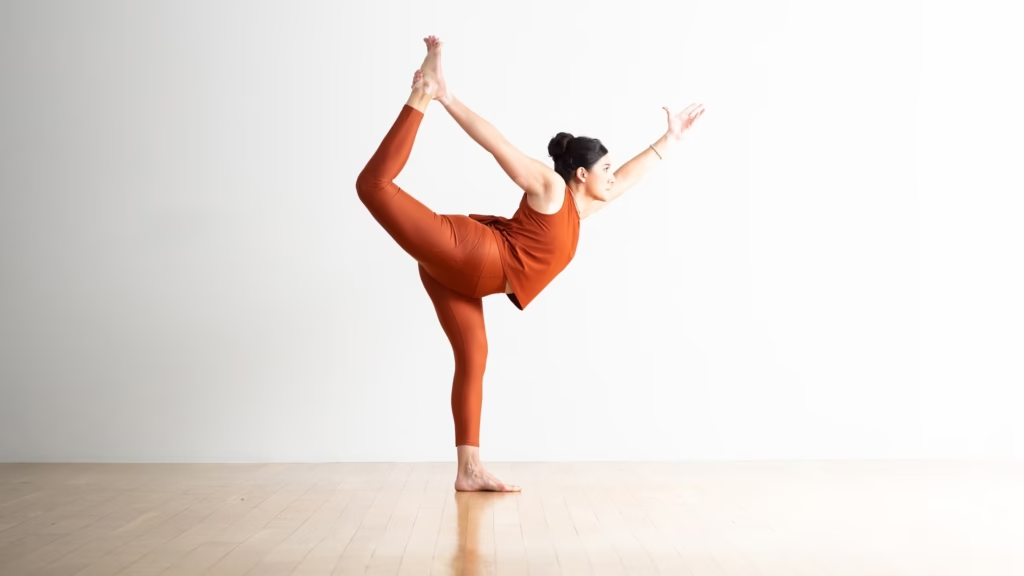
Advanced overhead grip variation
Natarajasana’s full expression has an overhead grip. The arm holding the foot rotates externally from the basic pose. The elbow spins upward before the other hand reaches back to grip the foot. Both elbows point toward the ceiling with biceps near the ears. This variation creates a beautiful heart opener that represents Shiva’s ancient dance—a balance of stability and dynamic movement.
Counter poses to cool down
The practice needs poses that neutralize the spine and release tension after dancer pose. Standing forward fold stretches the hamstrings and child’s pose calms the nervous system. The spine neutralizes with supine twists after backbending, while happy baby opens the hips gently. A reclined figure four stretches outer hips and glutes. The practice concludes with several minutes in savasana to absorb all benefits.
Becoming skilled at the dancer pose takes time, patience, and regular practice. This pose helps practitioners build physical strength and flexibility while improving mental focus and emotional balance. Natarajasana gives amazing benefits – it strengthens multiple muscle groups, enhances body awareness, and brings mental clarity.
Proper preparation is key before you try this challenging posture. A good warm-up sequence builds the foundations by opening your hips, chest, and shoulders. The body needs to generate enough heat first. On top of that, it helps to focus on proper form – especially when you have to keep your hips square and spread weight evenly through the standing foot. This prevents injuries and gives you the most benefits.
New practitioners should definitely start with modifications. Using a chair or strap works well, and you can progress to advanced variations as you build strength and confidence. Advanced yogis can explore the full expression of natarajasana with the overhead grip to experience a deep chest opening.
Counter poses are just as important after your dancer pose practice. These cooling postures help balance the spine and release tension. Without doubt, this detailed approach will give a safe and rewarding experience.
The dancer pose may challenge you at first, but it ended up becoming a beautiful display of balance, strength, and grace – just like Lord Shiva’s cosmic dance it represents. Your practice deserves patience. Honor where you are now, and watch this powerful pose change both your yoga practice and life beyond the mat.
Here are some FAQs about the dancer pose yoga tutorial:
How to cue a Dancer Pose in yoga?
To cue a Dancer Pose in yoga, instruct students to stand tall, shift weight to one leg, and bend the opposite knee to grab the inner foot. Guide them to press the foot into the hand while lifting the chest and extending the other arm forward, emphasizing the dancer pose benefits of balance and focus.
How to do natarajasana step by step?
To do natarajasana step by step, begin in mountain pose and shift your weight onto your left foot. Bend your right knee and reach back with your right hand to hold your right foot, then slowly kick the foot into your hand as you lift your chest and extend your left arm forward in the full king dancer pose yoga expression.
How to do yoga poses step by step?
To do yoga poses step by step, always start with proper alignment and breathing before moving into the full expression of any posture. For a dancer yoga pose specifically, begin with simple balancing poses to warm up before attempting the full natarajasana with its deep backbend and leg extension.
What is the hardest yoga pose ever?
The handstand scorpion pose is often considered the hardest yoga pose due to its extreme demands on balance, flexibility, and core strength. This advanced posture is significantly more challenging than the yoga dancer pose, which itself requires considerable balance and flexibility.
How to prep for a Dancer Pose?
To prep for a Dancer Pose, incorporate hip openers, quad stretches, and balancing poses into your practice. A well-structured dancer pose yoga sequence might include poses like low lunge, standing quad stretch, and tree pose to gradually build the flexibility and stability needed for the full expression.
What are the 4 main yogas?
The four main paths of yoga are Karma Yoga (yoga of action), Bhakti Yoga (yoga of devotion), Jnana Yoga (yoga of knowledge), and Raja Yoga (yoga of meditation). These philosophical paths are different from the physical practice of poses like the dancer yoga pose, though they can be integrated.
Can I lose 10 kg in a month with yoga?
Losing 10 kg in a month with yoga alone is generally not realistic or healthy, as this would require an extreme calorie deficit. While consistent practice of vigorous styles and poses like the dancer pose benefits your metabolism and muscle tone, sustainable weight loss requires a comprehensive approach including diet and other exercise.
Is 20 minutes of yoga everyday enough?
Yes, 20 minutes of yoga everyday is enough to build a consistent practice and see significant benefits over time. A daily session that includes poses like the yoga dancer pose can improve flexibility, strength, and mental focus, especially when practiced with intention and proper alignment.