Triangle pose yoga makes your legs and back stronger while opening your chest to help you breathe better. This simple-looking pose combines physical benefits with mental focus in powerful ways.
Regular practice of triangle pose (Trikonasana) strengthens your ankles, knees, legs, abdomen, chest, and back. On top of that, it stretches your hamstrings, inner thighs, calves, spine, shoulders, and hips. The revolved triangle pose takes these benefits even further and is a great way to build concentration and awareness that helps calm a wandering mind. Your thoracic spine becomes more mobile and your chest expands with consistent practice of this challenging twist.
This piece covers everything in triangle pose and its variations. You’ll find expert tips to arrange your body correctly, avoid common mistakes, and modify poses as needed. Learning proper triangle pose technique can energize your body, sharpen your focus, and improve your yoga practice – whether you’re just starting or working to refine your existing skills.
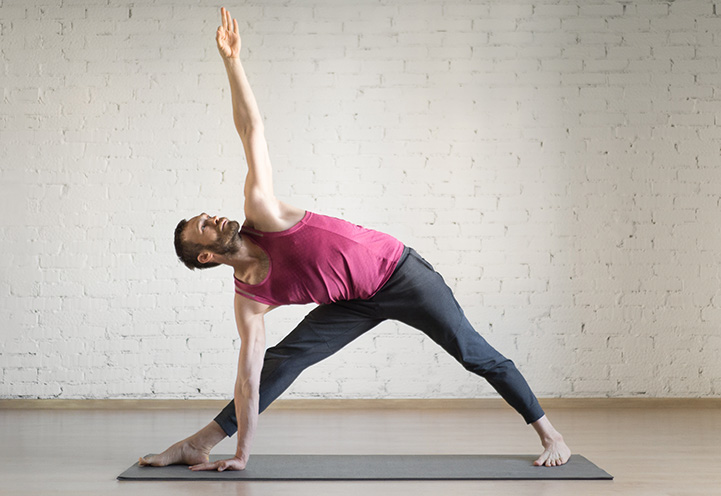
Table of Contents
- 1 Understanding Triangle Pose (Trikonasana)
- 2 Step-by-Step Guide to Triangle Pose
- 3 Common Mistakes and How to Fix Them
- 4 Modifications and Props for Better Alignment
- 5 Exploring Triangle Pose Variations
- 6 Here are some FAQs about the triangle pose yoga tutorial:
- 6.1 How to do the Triangle Pose in yoga?
- 6.2 Why is Triangle Pose so hard?
- 6.3 What is Trikonasana and their benefits?
- 6.4 Who should not do Triangle Pose?
- 6.5 What is the hardest yoga pose ever?
- 6.6 What are the common mistakes in triangle pose?
- 6.7 Can triangle pose help with back pain?
- 6.8 Can Trikonasana reduce belly fat?
Understanding Triangle Pose (Trikonasana)
Trikonasana comes from Sanskrit, where “tri” means three, “kona” means angle, and “asana” means posture. Your body creates multiple triangular shapes in this elegant standing position—between your legs and the floor, and between your arm, front leg and side body.
What is triangle pose in yoga?
Triangle pose stands as a foundational standing asana that embodies both stability and expansion. Practitioners stand with feet wide apart, turn one foot outward, extend the torso sideways, and reach one hand toward the ankle while stretching the other arm toward the ceiling.
This geometric alignment activates multiple muscle groups at once. A properly executed triangle pose strengthens your thighs, hips, core, back, and side body on the bottom side. The pose also stretches your chest, hamstrings, and side body on the top side.
Triangle pose holds deep symbolism in different traditions. Some interpretations see the three angles as creator, sustainer, and dissolver energies—mirroring natural cycles of emergence, flourishing, and release. Classical narratives suggest the three sides represent the Hindu trinity of Brahma (Creator), Vishnu (Preserver), and Shiva (Transformer), which embodies universal balance.
Why it’s foundational in many yoga styles
Triangle pose feels timeless but remains relatively modern in yoga’s historical timeline. Medieval texts like Haṭha Yoga Pradīpikā or Gheraṇḍa Saṃhitā don’t mention it. The pose emerged through the Mysore palace tradition under Sri T. Krishnamacharya in the late 19th and early 20th centuries. Influential yogis like B.K.S. Iyengar and K. Pattabhi Jois helped spread it globally.
Triangle pose has become vital in yoga styles of all types because it:
- Acts as a diagnostic posture that reveals alignment patterns and imbalances
- Creates fundamental strength and flexibility needed for more advanced poses
- Shows proper weight distribution and engagement principles
- Helps practitioners understand spinal extension and rotation
Each tradition interprets and teaches triangle pose uniquely. Ashtanga Vinyasa features it with a precise vinyasa count and specific gazing point (dṛṣṭi). Iyengar Yoga focuses on alignment details and often uses props. Modern vinyasa teachers may opt for shorter stances and neutral pelvis to ensure safety.
Triangle pose vs. revolved triangle pose
Triangle pose (Utthita Trikonasana) and revolved triangle pose (Parivrtta Trikonasana) work as complementary opposites. They naturally function as counter-poses to each other.
Revolved triangle’s physical execution requires significant changes in foot placement and hip rotation compared to the simple triangle. The front leg hip abducts, externally rotates, and flexes in regular triangle pose. Revolved triangle, however, emphasizes spinal movement. The twist requires different pelvis stabilization and thoracic spine rotation.
Practitioners find revolved triangle more challenging as it just needs extra core strength, spinal mobility, and balance. One teacher notes, “From Utthita Trikonasana to Parivrtta Trikonasana can be a big leap”. This progression lets practitioners experience different aspects of strength and openness.
Both poses strengthen your legs effectively. Revolved triangle specifically targets your thoracic spine, strengthens obliques, and compresses the abdominal cavity to massage internal organs. The pose serves as a powerful mental training tool. The twist keeps practitioners fully present—making it “a valuable antidote for a wandering mind”.
Step-by-Step Guide to Triangle Pose
The triangle pose yoga sequence demands careful attention to form and proper arrangement. This essential posture builds strength through step-by-step practice that starts with the right setup. Here’s a complete guide to help you perform it correctly.
1. Starting from Mountain Pose
Your trip to triangle pose starts from Tadasana (Mountain Pose), which creates the base for proper arrangement. Stand tall with feet together or hip-width apart. Keep your arms at your sides and distribute weight evenly through both feet. From this balanced position:
- Press firmly through all four corners of each foot
- Activate your leg muscles without locking your knees
- Stretch your spine upward like a puppet on a string
- Drop your shoulders away from your ears
- Keep your pelvis neutral
This mindful starting position helps develop the body awareness you need to execute the triangle pose properly.
2. Foot placement and leg alignment
A proper stance creates the foundation for triangle pose yoga. Step or jump your feet about 3 to 4 feet apart. Your ideal stance depends on your height and leg length. Shorter practitioners might need closer feet placement, while taller people might need a wider stance.
For right-side triangle pose:
- Turn your right foot 90 degrees toward the front of your mat
- Point your left foot slightly inward (about 45 degrees)
- Place your right heel in line with your left foot’s arch for better stability
Lift your kneecaps and engage your quadriceps to activate both legs. You can prevent hyperextension in the front knee by bending it slightly, lifting the heel, and squeezing the calf before you straighten the leg while keeping the calf engaged.
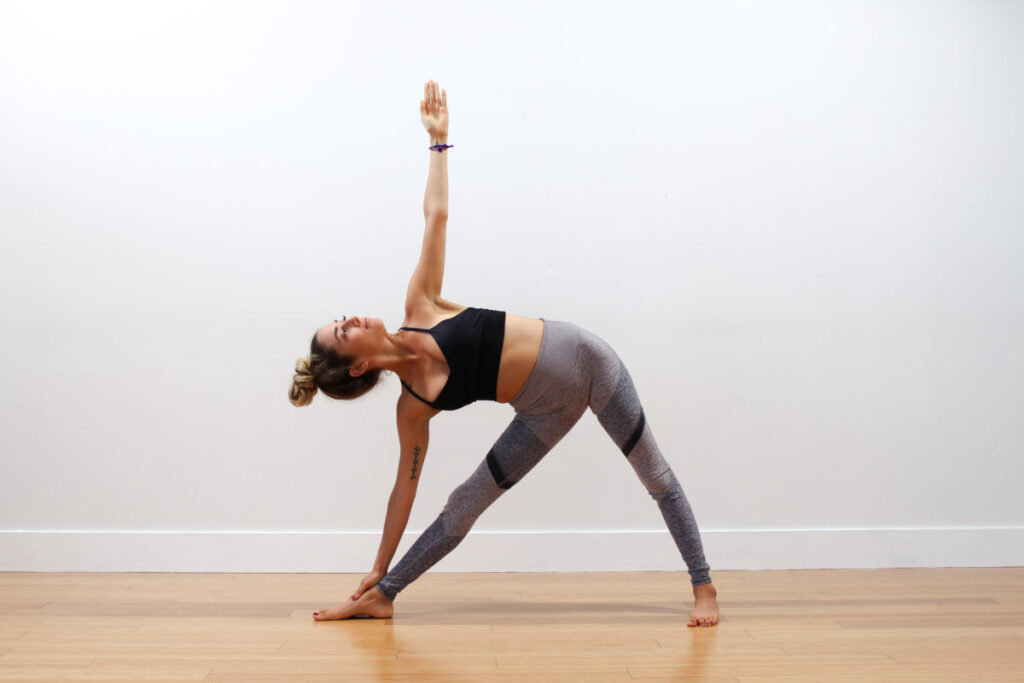
3. Arm extension and torso positioning
After securing your foundation, stretch your arms parallel to the floor at shoulder height with palms facing down. Reach through your fingertips while keeping relaxed shoulders.
The lateral movement follows these steps:
- Take a deep breath to create length through your waist
- Extend your torso directly over your right leg as you exhale, bending from your hip joint
- Move your right arm toward the mat’s front while your left hip stays back
- Bend at the hip to bring your torso right when you can’t stretch your side body anymore
- Reach your right hand toward the floor as your left arm extends upward
Keep equal length on both sides of your torso. Focus on maintaining the triangle shape rather than trying to reach lower.
4. Final adjustments and breath awareness
Perfect your arrangement with proper hand placement:
- Put your right hand on your shin, ankle, or the floor outside your right foot—choose what works best for your pose
- A block behind your front shin can provide support if needed
- Turn your palm so your thumb points the same way as your front foot
- Make sure you’re not leaning into your leg—you should be able to lift your hand briefly
For proper gaze (drishti), look straight ahead with your face lined up with your sternum. If it feels comfortable for your neck, turn your head to look up at your raised hand.
Breathe smoothly and deeply for 30-60 seconds. Press firmly through your back heel and engage your core to return to standing with an inhale. Take a moment to feel the effects before you repeat on the other side.
Common Mistakes and How to Fix Them
Even experienced yogis can hurt themselves and miss out on benefits when they make alignment mistakes in triangle pose. You can refine your trikonasana practice by learning these common errors.
Overreaching or collapsing the torso
Students often curve their spine too much in triangle pose yoga. They position themselves too far inside their base with a forward-curved spine. This happens because they try too hard to touch the floor with their hand instead of maintaining proper form. The side body closest to the floor becomes short and creates a forward bend instead of the lateral stretch we want.
To correct this issue:
- Keep your “Tadasana spine” during the whole pose
- Stop your side bend when you can’t keep your torso long
- Use a block or your shin to support your hand and keep proper spine alignment
- Make both sides of your waist equally long
Incorrect foot or hip alignment
Many students misunderstand how to position their hips in triangle pose. Teachers often say to “stack” the hips or fit “between two panes of glass.” But most people’s bodies can’t achieve the 90° external rotation needed in the front hip.
To align safely:
- Let your back hip roll slightly forward instead of forcing a perfect stack
- Keep a tiny bend in your front knee to avoid hyperextension
- Point your knee toward your second toe, not your big toe
- Pay attention to how your top hip relates to your front inner leg
Dumping weight into the front hand
Students often rely too much on their lower hand. This puts too much pressure on the wrist and front leg while core muscles stay inactive.
To fix this mistake:
- Position your hand so you could lift it off briefly
- Don’t push your hand against your leg – this creates harmful pressure
- Support your hand on your shin, ankle, or block while maintaining good form
- Use your core muscles to hold your weight instead of leaning on your hand
Neck strain from improper gaze
Your neck might hurt if you don’t look up toward your raised hand correctly. This happens when your head isn’t aligned well or your neck muscles aren’t strong enough.
To avoid neck pain:
- Look straight ahead first and align your face with your sternum
- Turn your head like a planet rotating on its axis when looking up
- Keep your neck in line with your spine and avoid overextending
- Look forward or slightly down if looking up feels uncomfortable
Note that triangle pose should work for your unique body rather than match some perfect shape. These adjustments will help you practice triangle pose yoga more safely and get better results.
Modifications and Props for Better Alignment
Props and changes make triangle pose yoga more available to practitioners at all levels. These adjustments help you get better alignment, prevent injury, and let everyone experience the benefits of this powerful asana.
Using a block for hand support
A yoga block is your best friend as a prop for triangle pose. Each block gives you three height options – low (flat), medium (on its side), or high (on its end) – sometimes called “Baby Bear, Mama Bear, and Papa Bear” levels. You should place the block near your front foot’s pinky toe and make sure it lines up correctly.
Pick a block height that lets you breathe deeply without restriction. If you can’t breathe easily, just turn your block to a higher level. Many students think blocks are just for beginners, but even flexible practitioners get better side-body extension when they use blocks.
Adjusting stance width for stability
Studies show that stance width affects how much weight goes into your legs during triangle pose. Your front leg bears more weight with wider stances, while your back leg carries less. This helps you adjust your stance based on what you want to achieve or work around.
You might want to take a slightly smaller stance than usual to feel more stable. Moving your front foot outward by a few inches adds support. Shorter people often need their feet closer together, while taller practitioners can step them further apart.
Top hand on hip for balance
Your top hand works great on your hip if you’re new to the pose or need help with balance. This change gets your core muscles working because you won’t rely too heavily on your bottom hand.
Students often put too much weight on their bottom hand and hurt their wrist. A hand on your hip helps spread your weight evenly through both feet and makes your core stronger.
Looking down instead of up
Your gaze direction can help avoid neck strain. The traditional way asks you to look up at your extended arm, but looking forward or down works just as well.
Keep your neck in line with your spine by looking straight ahead with your face parallel to your sternum. This works really well if you’re just starting out or have a sensitive neck, and it keeps the pose’s benefits intact. Note that good alignment matters more than getting the perfect shape in triangle pose.
Exploring Triangle Pose Variations
The classic triangle pose has several variations that expand your practice and work different muscle groups. These adaptations help practitioners at all levels face new challenges and gain different benefits.
Revolved triangle pose (Parivrtta Trikonasana)
Revolved triangle pose creates a powerful spinal twist that builds concentration and one-pointed focus (ekagrata). This challenging variation tests your balance and demands deep spinal rotation. Your mind must stay completely present during the twist, making it perfect for taming a wandering mind. Parivrtta Trikonasana specifically works the thoracic spine—an area many practitioners struggle to access. The safest approach focuses on rotating from your mid-back instead of straining your neck.
Reverse triangle pose
Reverse triangle pose (Viparita Trikonasana) gives practitioners a new direction of movement. The pose keeps its triangular shape while engaging muscles differently. Reverse triangle might not appear in classes as often as other variations, but it balances the practice by working the body in opposite patterns.
Fallen triangle yoga pose
Fallen triangle pose (Patita Tarasana) blends elements from triangle and side plank poses. This dynamic position builds core strength, improves flexibility, develops balance, and opens the chest and shoulders. You could call it “Side Plank with training wheels”. The pose demands a strong upper body base and careful wrist placement.
Bound triangle pose
Bound triangle pose (Baddha Trikonasana) deepens the traditional posture through binding behind your front leg. Your chest and shoulders open deeply while your torso lengthens in this variation. The binding action awakens the heart and lungs, stimulating the heart chakra. Many practitioners find success by bending their front knee first before straightening into the full pose.
Extended arm variation
Extended arm variations offer different ways to position your arms. Reaching one arm overhead reinforces key shoulder actions—flexion and external rotation—that prepare you for deeper inversions or backbends. Both arms reaching overhead builds trunk stability and core strength effectively. These changes work your body differently than traditional arm positions.
Triangle pose is a basic yoga posture that brings amazing benefits despite its simple look. This powerful asana strengthens multiple muscle groups at once and improves flexibility in your hamstrings, hips, and spine. The mental focus you need during practice helps both on and off the mat.
Proper form is the life-blood of a triangle pose that works. Many yogis rush to touch the floor while sacrificing good form. You’ll get more benefits by keeping length through both sides of your torso rather than trying to reach lower. Focus on lining up your body correctly instead of how far down you can go. Use blocks or other modifications if you need them.
Triangle pose variations give you a chance to explore different aspects of strength and flexibility. The revolved triangle especially tests your balance while helping with thoracic mobility. Advanced practitioners can try bound and fallen variations to take their practice deeper.
Your body will respond uniquely to triangle pose. Some people feel it most in their hamstrings, while others notice the biggest changes in their side body or back. Without doubt, these differences show why you should use props and modifications freely.
Regular triangle pose practice changes both your body and mind. The strength, flexibility, and focus you develop through this asana carry over into everyday activities. Your posture, balance, and body awareness improve throughout the day. Triangle pose energizes your body and calms your mind, making it vital to a complete yoga practice – whether you do it in a flow or hold it on its own.
Here are some FAQs about the triangle pose yoga tutorial:
How to do the Triangle Pose in yoga?
To do the Triangle Pose in yoga, stand with feet wide apart, turn your right foot out 90 degrees, and extend your arms parallel to the floor. Hinge at your hip to reach your right hand toward your shin while lifting your left arm toward the ceiling, creating one straight line from your left foot to your left hand in the classic yoga triangle pose.
Why is Triangle Pose so hard?
Triangle Pose is challenging because it requires simultaneous hip mobility, hamstring flexibility, core engagement, and shoulder openness. Many people find the revolved triangle pose yoga variation even more difficult as it adds a spinal twist to the already demanding alignment requirements.
What is Trikonasana and their benefits?
Trikonasana is the Sanskrit name for Triangle Pose, a fundamental standing posture in many yoga traditions. The triangle pose benefits include strengthening the legs, stretching the hips and hamstrings, improving digestion, and increasing overall stability and balance.
Who should not do Triangle Pose?
People with recent hip, knee, or shoulder injuries should avoid Triangle Pose or practice only with medical guidance. Those with low blood pressure or certain spinal conditions might also want to modify or skip this triangle yoga pose to prevent strain or dizziness.
What is the hardest yoga pose ever?
The handstand scorpion pose is often considered the hardest yoga pose due to its extreme demands on balance, flexibility, and core strength. This advanced inversion is significantly more challenging than the fallen triangle yoga pose or other arm balances that require less overall body control.
What are the common mistakes in triangle pose?
Common mistakes in triangle pose include collapsing the chest forward, locking the front knee, and sinking into the bottom hip instead of lifting it. Many practitioners also fail to create a straight line from their back foot through their lifted hand, diminishing the triangle pose benefits.
Can triangle pose help with back pain?
Yes, triangle pose can help with back pain by stretching and strengthening the muscles along the spine and improving overall posture. The gentle side stretch in this yoga triangle pose can alleviate tension in the lower back when practiced with proper alignment and awareness.
Can Trikonasana reduce belly fat?
While Trikonasana won’t specifically target belly fat, it can contribute to overall weight management as part of a consistent yoga practice. The triangle pose benefits include engaging the core muscles and improving metabolic function, which supports a healthy body composition when combined with proper nutrition and other exercises.