Key Takeaways
- Wheel Pose lifts from leg drive and glute engagement, not lumbar flexibility. Pressing the feet down and firing the glutes raises the hips safely.
- Lower back pain in Wheel Pose signals a setup error like flared ribs or splayed knees, not a permanent limit a practitioner must accept.
- Treat Wheel Pose as a strength and stability drill, not a flexibility trophy. Even thoracic extension beats deep lumbar collapse every time.
- A 5-6 week progression from Bridge through wall-supported lifts builds the strength and mobility the spine needs before the full pose.
- Blocks, straps, and wall support are legitimate long-term practice, not training wheels, delivering real strength benefits without forced range.
- Claims about pituitary stimulation and hormonal balance come from yoga tradition, not clinical research. Strength and spinal mobility gains are evidence-backed.
A maximal arch with no strength behind it dumps stress into roughly five lumbar vertebrae that were never built to absorb it. A controlled lift driven by the legs spreads that same load across the hips, shoulders, and upper back, where the body can actually handle it. That single difference is why one practitioner walks away energized and another walks away icing a sore lower back. The fear that backbending will hurt is reasonable, and it usually comes true only when technique is missing. A practitioner can reach Wheel Pose without back pain by treating it as a strength drill, pressing through the feet and sending the chest through the arms instead of cranking the lower spine.
What Wheel Pose Actually Is (and Why the Name Matters)
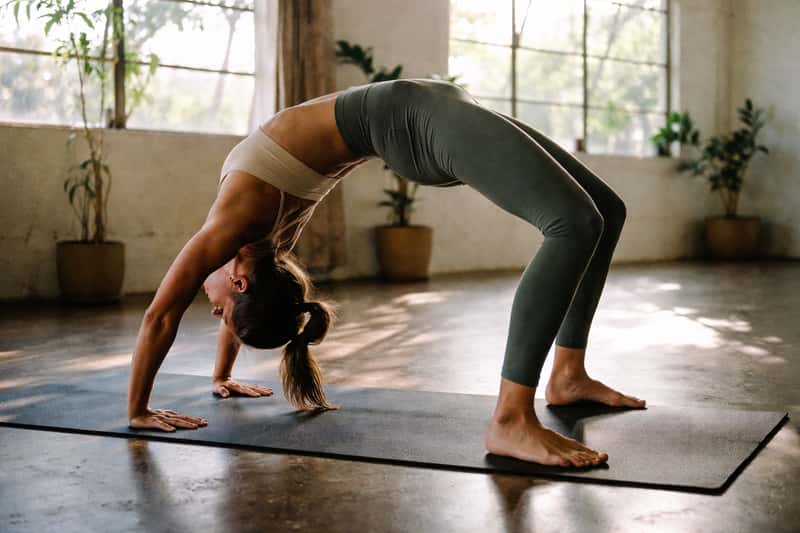
Wheel Pose is a deep backbend, known in Sanskrit as Urdhva Dhanurasana and sometimes Chakrasana, that loads the entire body rather than just the spine. The practitioner lies on the back, plants the hands by the ears and the feet near the hips, then presses up into a high arch. A healthy backbend distributes load across the legs, shoulders, and thoracic spine. When those areas do not share the work, the lumbar spine overcompensates, and that is where pain starts. So the searched name matters less than the mechanics underneath it.
Urdhva Dhanurasana, Chakrasana, and Upward Bow
Three names describe the same shape from different angles. Urdhva Dhanurasana means “upward bow,” pointing to the tension built by pressing the limbs into the floor like a drawn bowstring. Chakrasana means “wheel,” describing the round curve of the body. Upward Bow is the common English translation. The “wheel” names the look; the “bow” names the work.
Where Wheel Sits on the Difficulty Map
WebMD classifies Wheel Pose as an intermediate-to-advanced posture in its yoga pose library. It is not a beginner’s first backbend, and skipping the base underneath it is exactly how lower backs get hurt. A practitioner who holds Bridge comfortably for several breaths with steady leg drive has the foundation to begin building. If Bridge still feels shaky, that is the starting point, not Wheel.
The Reframe: Wheel Is a Strength Drill, Not a Flexibility Trophy
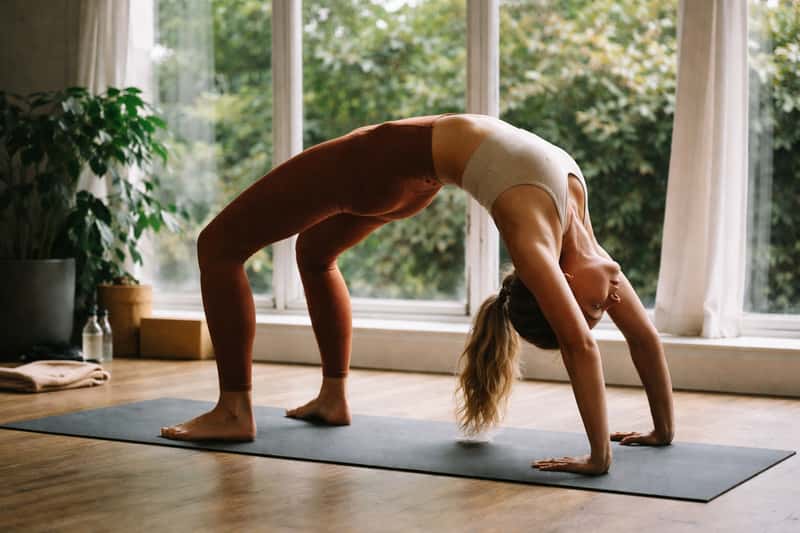
Here is the shift that changes everything. The power in Wheel Pose comes from pressing through the feet and sending the chest through the arms, not from arching the lower back. Anatomy-informed teachers stress that the setup is what protects the spine: yoga educators who break the pose down by biomechanics point to drive coming off the feet and the chest traveling through the arms as the real engine of the lift, rather than depth of bend. Treating the pose as a strength and stability exercise drops pain and speeds progress.
Leg Drive and Glute Engagement Do the Lifting
The legs and glutes initiate the lift, not the lower spine. When a practitioner presses the feet firmly into the floor and fires the glutes, the hips rise as a unit. When the posterior chain does its job, the hips lift without dumping load into the lumbar. Weak or passive legs force the lower back to hinge alone, which is the most common source of pain.
Why “Deeper” Is the Wrong Goal
The Instagram arch sells a lie. A maximal bend without strength behind it concentrates stress in the most vulnerable segment of the spine. Going “deeper” by collapsing into the lumbar is not progress, it is borrowing range from a joint that cannot pay it back. Even extension across the whole spine beats deep collapse every time, and it is the version that keeps improving.
Why the Lower Back Hurts in Wheel (and the Cues That Fix It)
Pain in Wheel is rarely a fixed limitation. It is almost always a setup error. The lumbar spine has limited safe extension, so when the thoracic spine and shoulders stay closed, the lower back hinges hard to make up the difference. The National Center for Complementary and Integrative Health, in its overview of yoga safety, reports that injury risk drops sharply with proper technique and gradual progression. That is exactly what these fixes deliver.
Flared Ribs: Knit the Front Ribs Down
When the front ribs splay toward the ceiling, the lumbar spine hyperextends to follow. Instead of cranking the belly upward, a practitioner draws the front ribs down toward the hips and lengthens the tailbone toward the knees. This keeps the arch spread through the mid-back rather than jammed into one spot.
Splayed Knees and Feet Turning Out
Knees falling open and feet rotating outward kill leg drive and torque the lower back. The fix is to keep the feet hip-width and parallel, with the knees tracking directly over the toes. Parallel feet let the glutes and hamstrings push cleanly instead of letting the load slide into the spine.
Open the Thoracic Spine, Not the Lumbar
Send the extension to the upper back and shoulders. Walking the hands a little closer, pressing the chest toward the wall behind, and letting the mid-back round backward all redirect the curve. When the thoracic spine opens, the lumbar finally gets to rest instead of carrying the whole arch.
A Multi-Week Progression from Bridge to Full Wheel Pose
Most guides hand a practitioner isolated drills and call it a plan. This is an ordered build instead. A warm-up that opens the thoracic spine and shoulders, like the sequences in our yoga flow ideas guide, sets up every single session before the peak pose.
Weeks 1-2: Bridge Variations and Posterior-Chain Strength
The first two weeks build glute and hamstring strength. A session looks like this: warm up with five slow cat-cow rounds, then hold a two-leg Bridge for 8 to 10 breaths, rest, and repeat for three rounds. Follow with single-leg Bridges, 8 reps per side, lowering slowly over a count of three on each rep. Finish with a 30-second supine twist per side. Three sessions a week is enough. The goal is leg drive a practitioner can trust before ever going upside down. If the hips sag or the back aches in Bridge, that is the signal to stay here until they do not.
Weeks 3-4: Shoulder and Thoracic Opening Plus Half-Wheel at the Wall
Weeks three and four add mobility on top of that base. Open each session with dolphin, holding 5 breaths for three rounds, then cobra, lifting on an inhale and lowering on an exhale for 6 reps. Add supported camel with hands on the heels or blocks, holding 5 breaths for two rounds, to open shoulder flexion and thoracic extension. Then rehearse the shape: stand facing away from a wall, walk the hands down the wall toward the floor and back up for 4 to 6 slow reps, or set blocks against the wall under the hands for a controlled partial lift, 3 reps held for 3 breaths each. This teaches the movement with control before adding full load. Keep the Bridge work from weeks one and two as a warm-up.
Weeks 5-6: Pressing Into Full Wheel
The final two weeks combine the strength and mobility into the lift. After a full warm-up of Bridge, dolphin, and one round of cobra, loop a strap around the upper arms, just above the elbows, to stop them from splaying wide. Press through the feet, lift to the crown of the head, pause for two breaths, then push to straight arms. Hold the full lift 5 to 10 breaths, lower with control, and rest a full minute. Aim for two or three clean reps per session rather than one forced deep one. Quality of the lift matters more than depth of the arch.
Realistic Modifications for Every Body
One prop mention is not enough for real bodies. These setups keep the pose accessible for non-flexible, older, or heavier practitioners without forcing range nobody has yet.
| Limitation | Modification | What it fixes |
|---|---|---|
| Tight shoulders | Blocks under hands at the wall, angled | Reduces shoulder flexion demand |
| Elbows splaying out | Strap around upper arms | Holds shoulder alignment, protects lower back |
| Limited strength | Wall-supported lift, walk hands down | Builds the press with less load |
| Wrist pain | Stay in Bridge or half-wheel | Removes weight-bearing on wrists |
| Larger body | Elevated hands on blocks, partial lift | Most strength benefit, less risk |
Blocks, Straps, and the Wall
Block-supported hands raise the floor up, shrinking how much shoulder mobility the pose demands. A strap around the upper arms keeps the elbows stacked so force travels up cleanly. Wall-supported lifts build pressing strength gradually. Each prop solves one specific limitation, not all of them at once.
When Half-Wheel or Bridge Is the Smart Stopping Point
Staying supported is not failure. For tight shoulders, limited wrists, or a larger frame, an elevated or partial lift gives nearly all the posterior-chain and upper-body strength benefit with far less risk. A strong half-wheel beats a painful full one. The supported version is the real practice if that is what the body wants today.
Working With Fear of Going Backward

Reversing into a backbend triggers a genuine protective response, and naming that helps more than pretending it is not there. The nervous system reads “going backward blind” as a threat and tightens everything that needs to stay loose. Three concrete strategies settle that response, and they work best stacked together.
Breath and Pacing to Settle the Nervous System
Steady nasal breathing signals safety to the body. The pattern is simple: inhale to prepare, exhale to press up, and keep the breath even through the hold. Lowering on a long exhale rather than collapsing keeps the exit calm. Rushing the entry or exit spikes the threat response and undoes the openness just earned.
Grounding and Progressive Exposure
Beyond breath, two more techniques ground the nervous system. The first is sensory grounding before the lift: pressing the full surface of both feet and both palms into the floor and naming the contact points slows the threat response and reorients attention to support rather than fear. A practitioner can spend three slow breaths feeling all four points before any lift. The second is progressive exposure, building the movement in stages so the nervous system never faces an unfamiliar jump. That means starting with wall walk-downs, then block-supported partial lifts held for two breaths, then a brief crown-of-the-head pause, and only then a full lift. Each stage is repeated until it feels routine before moving to the next. Trust gets built rep by rep, not by willpower.
What Wheel Pose Does: Tradition Versus Research
The claimed benefits deserve sorting, not parroting. Some are supported by general movement and yoga research, others belong to tradition and lived experience. Knowing which is which keeps the practice honest and keeps students trusting their teacher.
Evidence-Backed Benefits
Yoga Journal’s pose breakdown notes that Wheel strengthens the posterior chain, upper body, and core while stretching the chest, shoulders, and hip flexors. It also improves spinal mobility, which directly counters the forward-hunched shape of prolonged sitting. Broader yoga research links this kind of controlled movement to better back pain management when technique is sound, which loops right back to the strength-first reframe.
Traditional Claims to Hold Loosely
Wheel is often credited with stimulating the pituitary gland, balancing hormones, and lifting mood. These claims trace to yoga lineage and are largely experiential rather than clinically tested. The mood lift many people feel after backbends is real and worth noting; the glandular mechanism is tradition, not trial data. Holding those claims loosely keeps the practice credible.
Safety, Contraindications, and a Clean Exit
Risk is manageable when a practitioner knows who should modify and how to come down right. This is the part rushed guides skip, and it is the part that keeps a body practicing for years.
Who Should Skip or Modify
A practitioner should skip or heavily modify Wheel Pose with an existing lower-back injury, wrist limitations, recent shoulder issues, uncontrolled high blood pressure, glaucoma, a hernia, or in late pregnancy, all of which WebMD lists among the contraindications for deep backbends. Sharp pain, tingling down the limbs, or dizziness are immediate stop signals. None of those are something to breathe through.
How to Come Down Without Crunching the Neck
Exit with control. Tuck the chin toward the chest, bend the elbows and knees, and lower slowly through the upper back. Never drop straight onto the crown of the head, which compresses the neck fast. Follow with a gentle counterpose, a supine twist or reclining bound angle, to neutralize the spine. Wheel stops being scary the moment a practitioner stops chasing the arch and starts training the lift. Build the legs, open the upper back, prop what needs propping, and the full pose arrives on its own schedule. For a warm-up that sets the shoulders and thoracic spine up for backbends, our yoga flow ideas guide is the place to start.
FAQs about wheel pose
Is wheel a yoga pose or a fitness move?
Wheel is a traditional yoga pose called Urdhva Dhanurasana or Chakrasana. It is a deep backbend that also functions as a full-body strength exercise, working the legs, glutes, shoulders, and core.
Should a practitioner master Bridge before attempting wheel pose?
Yes. Bridge teaches the leg drive and glute engagement that protect the lower back in Wheel. A practitioner who can hold Bridge comfortably for several breaths with strong legs has the base to begin a progression toward the full pose.
How long should wheel pose be held?
Most teaching resources recommend holding for 5 to 10 breaths and repeating up to three times, with a proper warm-up and a counterpose afterward. Quality of one controlled hold beats several rushed, painful ones.
Why does the lower back hurt in wheel pose?
Lower-back pain usually comes from a setup error: flared ribs, splayed knees, feet turning out, or collapsing into the lumbar spine instead of extending through the upper back. Fixing alignment and driving through the feet removes most of that pain.
Can a 30-minute session prepare a practitioner for wheel pose?
A focused 30-minute session of bridge variations, dolphin, cobra, and supported camel makes a solid prep, but reaching the full pose safely takes a multi-week build. Short daily sessions layer strength and mobility over time.
What muscles does wheel pose work?
Wheel strengthens the glutes, hamstrings, spinal extensors, triceps, shoulders, and core, while stretching the chest, abdomen, hip flexors, and front of the thighs. The legs and shoulders should carry the load, not the lumbar spine.
What are good wheel pose modifications for a heavier or older body?
Blocks under the hands at a wall reduce shoulder demand, a strap around the upper arms holds alignment, and a wall-supported partial lift builds strength with less load. An elevated half-wheel delivers most of the strength benefit with far less risk.
Does wheel pose really balance hormones or stimulate the pituitary gland?
Those claims come from yoga tradition and are experiential, not clinically proven. Evidence supports strength gains and improved spinal mobility, so the hormonal and glandular claims are worth knowing rather than treating as established fact.
How does a practitioner get over the fear of going backward into wheel?
Build exposure with control: practice wall walk-downs, ground through both feet and palms before lifting, lower slowly on long exhales, and use steady nasal breathing to signal safety. Familiar, repeated reps teach the nervous system the movement is safe.
How does a practitioner come out of wheel pose safely?
Tuck the chin, bend the elbows and knees, and lower slowly through the upper back, never dropping onto the crown of the head. Follow with a supine twist or reclining bound angle to neutralize the spine.